

Introduction to NPSP
NPSP is a free, open-source add-on application built on the Salesforce platform, tailored to help nonprofits manage donors, donations, volunteers, and other crucial aspects specific to their needs.

Key Features of NPSP:
- Constituent Relationship Management (CRM): NPSP offers a robust CRM system tailored for nonprofits, enabling them to effectively manage and track relationships with donors, volunteers, partners, and other stakeholders.
- Donation Management: NPSP includes tools for managing and automating the process of receiving and tracking donations, allowing nonprofits to streamline their fundraising efforts.
- Household Account Model: This feature allows nonprofits to manage groups of contacts within a household, making it easier to handle family relationships and share information.
- Fundraising Campaigns: NPSP provides functionalities to plan, execute, and monitor fundraising campaigns, helping nonprofits organize and optimize their fundraising activities.
- Volunteer Management: Nonprofits can automate the creation and assignment of tasks for volunteers, simplifying coordination and enhancing volunteer engagement.
- Reporting and Analytics: NPSP comes with reporting and analytics capabilities that provide insights into donor engagement, campaign performance, and other key metrics, aiding data-driven decision-making.
- Automation and Workflows: The platform enables nonprofits to automate routine tasks and create workflows, freeing up time and resources for more impactful activities.
- Integration with Nonprofit Cloud: NPSP is part of Salesforce’s Nonprofit Cloud suite, which offers a comprehensive set of tools designed to meet the holistic needs of nonprofit organizations.
- Customizable Data Model: NPSP’s data model can be tailored to match the unique requirements of different nonprofit organizations, ensuring data accuracy and relevance.
- Engagement Plans: This feature assists in developing personalized engagement plans for donors and supporters, enhancing communication and long-term relationships.
- Event Management: NPSP allows nonprofits to manage events, from registration and attendee tracking to post-event analysis, enabling efficient event planning and execution.
- Grant and Program Management: The platform helps nonprofits manage grants, track program outcomes, and ensure compliance with reporting requirements.
- Integration and Extensibility: NPSP can be extended and integrated with other tools and applications, enabling nonprofits to create a tailored technology ecosystem.
- Community and Collaboration: NPSP fosters a community of nonprofit professionals, consultants, and developers, facilitating collaboration, knowledge-sharing, and best practices.
Benefits of using NPSP:

Integration Capabilities
Seamless integrations with other tools and platforms

Community-Driven Development
Built with feedback from a vast community of nonprofits, ensuring it caters to real-world needs
Affordability
With a number of licenses offered for free to qualifying nonprofits and deep discounts thereafter, it’s an economical choice

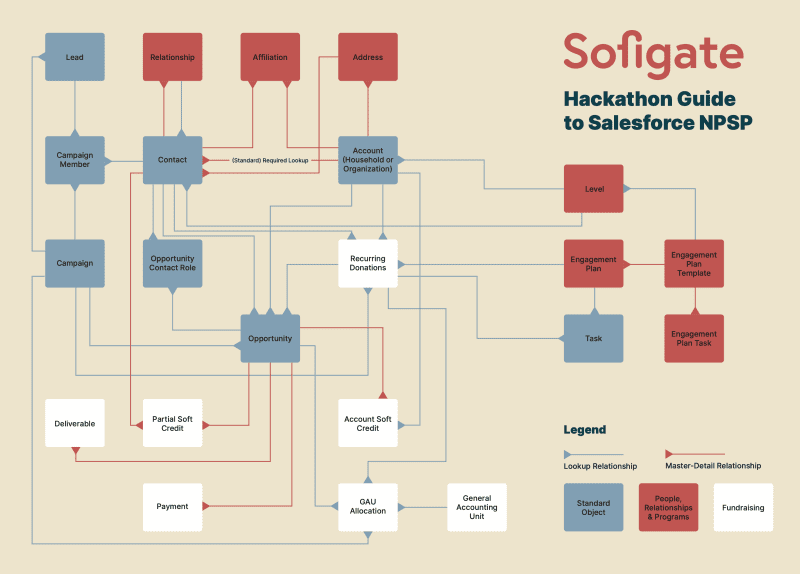
Data model:
The Nonprofit Success Pack (NPSP) is a powerful solution developed by Salesforce.org to cater to the unique needs of nonprofit organizations. At its core, NPSP extends and modifies the standard Salesforce data model, introducing new objects, relationships, and functionalities specifically designed to address the challenges and operations of the nonprofit sector.
The NPSP Data Model is an instrumental aspect of how Salesforce empowers nonprofits to focus on their mission while providing a robust and intuitive platform for managing donors, contributions, relationships, and more. By understanding this data model, organizations can leverage the full power of Salesforce to drive impact, engage with stakeholders, and further their cause.
1. Household Accounts
In the traditional Salesforce model, Accounts usually represent companies, and Contacts represent individuals associated with those companies. NPSP introduces the concept of Household Accounts:
- Each Household Account represents a group of individuals, typically living together or related in some manner.
- Helps nonprofits understand and engage with entire families or household units, capturing the collective impact of their contributions.
2. Opportunities & Donations
While Salesforce uses Opportunities to track potential sales, NPSP repurposes this object for nonprofit needs:
- Opportunities represent donations, grants, memberships, or other forms of financial contributions.
- Specialized record types are introduced, like “Grant”, “Major Gift”, or “In-Kind Gift”, allowing more precise tracking of different contribution types.
3. Recurring Donations
One of the unique challenges nonprofits face is managing recurring contributions. NPSP introduces the Recurring Donations object:
- This allows organizations to track ongoing commitments from donors, whether they’re monthly, quarterly, or annually.
- Helps in forecasting potential future income from committed donors.
4. Affiliations & Relationships
Understanding and nurturing relationships are key in the nonprofit world:
- Affiliations allow Contacts (individuals) to be linked with multiple Accounts (organizations), helping to track a person’s association across various entities.
- Relationships help in mapping connections between Contacts. For example, if two individuals are siblings or if one is a mentor to another.
5. General Accounting Units (GAUs)
To track donations targeted towards specific programs, initiatives, or departments, NPSP offers GAUs:
- Each GAU can represent a unique fundraising initiative or project.
- Donations can be allocated fully or partially to these GAUs, providing clarity on funding sources for each initiative.
6. Levels
Recognizing and categorizing donors is essential for tailored engagement strategies:
- Levels provide automatic segmentation based on criteria such as donation amounts, allowing organizations to categorize donors as “Gold”, “Silver”, “Bronze”, etc.
7. Customizable Rollups
Understanding aggregated data is vital for nonprofits:
- NPSP’s Customizable Rollups feature aggregates data from related records into summary fields, allowing nonprofits to gain insights at a glance, such as a donor’s total contributions over time.

Optimizing Nonprofit Success Pack (NPSP): Configuration and Development Best Practices
Proper configuration and development within the Nonprofit Success Pack (NPSP) environment is crucial for nonprofits to effectively utilize the toolset. Adhering to best practices ensures optimal system performance, data integrity, and user satisfaction. Let’s delve into the best practices in NPSP configuration and development:
- Understanding NPSP’s Unique Data Model
- Familiarize with Key Components: Before diving into configurations, understand the essential elements like Household Accounts, GAUs, Affiliations, Recurring Donations, and so on.
- Avoid Duplication: NPSP has its own duplicate management tools and processes, so ensure they’re configured properly to maintain data integrity.
- Data Management and Quality
- Robust Duplicate Rules: Set up and regularly review duplicate management rules tailored to nonprofit data trends.
- Data Validation: Use validation rules to enforce data consistency and accuracy. For instance, ensure donation amounts are never negative.
- Household and Account Management
- Use NPSP Household Model: Instead of trying to recreate the wheel, utilize the built-in NPSP Household model to efficiently manage and group related contacts.
- Customize Household Naming: Adjust naming conventions to be intuitive and relevant to the organization’s preference.
- Customization and Extension
- Use Sandboxes: Always make changes and test them in a sandbox environment first before deploying to production.
- Avoid Over-customization: While Salesforce is highly customizable, avoid making unnecessary customizations that might complicate future updates or introduce system inefficiencies.
- Leverage Existing NPSP Features: Before creating new functionalities, ensure that similar features don’t already exist in NPSP.
5. Automation Best Practices
- Test All Automations: Before deploying triggers, process builders, or flows, thoroughly test them to avoid unintended consequences.
- Optimize Batch Processes: Schedule batch jobs in non-peak hours and monitor their performance. Adjust batch sizes as necessary to prevent system timeouts.
6. Opportunity Management and Reporting
- Customize Record Types: Utilize different Opportunity Record Types for different donation forms such as Grants, Major Gifts, and In-Kind Gifts.
- Utilize NPSP Reporting: NPSP comes with several out-of-the-box reports tailored for nonprofits. Familiarize and use these before creating new ones.
7. Continual Learning and Community Engagement
- Stay Updated: NPSP is continually evolving. Stay updated with releases and new features by engaging with the Power of Us Hub, Salesforce’s community platform for nonprofits.
- Seek Expertise When Needed: If unsure about a particular configuration or development approach, consult with Salesforce NPSP experts or the wider community.
8. Training and Documentation
- Ongoing User Training: Ensure that all users receive training, not only on Salesforce basics but on the specific configurations and customizations tailored to the organization.
- Maintain Comprehensive Documentation: Document all configurations, customizations, and development work. This aids in troubleshooting and ensures continuity if there are personnel changes.
9. Plan for Scalability
- Consider Data Volumes: As the organization grows, so will its data. Plan storage, data archival strategies, and consider the potential need for Salesforce’s enterprise-level features or additional packages.
10. Data Backup and Recovery
- Regular Backups: Schedule and ensure regular backups of your Salesforce data.
- Have a Recovery Plan: In the rare event of data loss, have a recovery plan in place detailing steps for restoration.
Harnessing NPSP: Real-World Scenarios and Best Practice Implementations
1. Use-case: Recurring Donations Tracking
Scenario: A donor, Mr. John Smith, pledges to donate $50 monthly for a year to the nonprofit.
Implementation:
- Define Requirements:
- The total pledged amount over the year is $600 ($50 x 12 months).
- The pledge is to be fulfilled in monthly increments.
- Track each payment and automate reminders, if possible.
2. Recurring Donation Record Creation:
- Navigate to the Recurring Donations tab in Salesforce.
- Click on “New Recurring Donation”.
- Name: John Smith Monthly Pledge
- Contact: John Smith
- Amount: $50
- Recurring Type: Fixed
- Recurring Period: Monthly
- Start Date: [The agreed-upon start date]
- End Date: [One year from the start date]
- Installments: 12 (since it’s a 12-month pledge)
- Save the record.
3. Track Individual Donations:
- As Mr. Smith fulfills his pledge each month, a new Opportunity linked to the recurring donation, and a Payment record linked to this Opportunity will be created.
- Opportunity and associated Payment records can be configured for automatic creation. In such a setup, when a payment is marked as ‘Paid’, an Opportunity for the subsequent installment will be automatically generated.
- When the payment is registered, set the Payment Date on the Payment record, and set the Paid field to true. This will trigger the creation of a new installment Opportunity and Payment.
4. Automated Reminders:
- Using Salesforce Process Builder or Flow, create a process that sends an automated reminder to Mr. Smith a few days before each monthly due date. This ensures timely fulfillment.
- The reminder can be an email providing him with information on how to fulfill his pledge, possibly with a direct payment link.
- This can also be accomplished by integrating with external invoicing or payment platforms.
5. Acknowledgment of Payments:
- Set up an automated ‘Thank You’ email or message to be sent upon each successful donation receipt.
- For annual or milestone acknowledgments, consider more personalized gestures like a handwritten note or a special certificate.
6. Reporting & Analysis:
- Create custom reports to track recurring donations, individual payment status, and any outstanding amounts.
- Use these reports to derive insights, such as consistency of monthly donations, and to identify potential issues like frequently missed months.
7. Testing:
- Test the whole process, especially automated elements like reminders and acknowledgments, to ensure smooth operation.
8. Training & Documentation:
- Train the fundraising or donor relations team on managing and tracking recurring donations within NPSP.
- Create user guides or documentation for reference.
9. Continuous Monitoring & Feedback:
- Regularly check on the recurring donation records and associated opportunities.
- Seek feedback from donors like Mr. Smith on the process, reminders, and acknowledgment systems. Make refinements as necessary.
By systematically tracking and managing recurring donations like Mr. Smith’s pledge, “GreenFuture” can ensure a consistent flow of funds, build a stronger relationship with their donors, and forecast their financial future with greater accuracy.
2. Use-case: Constituent Relationship Management and Donations setup
Scenario: “HealthyKids Foundation” is a nonprofit organization that works to improve children’s health worldwide. They want to track individual one-time donations, recurring monthly donations, and have a way to quickly thank donors.
Implementation:
- Define Requirements:
- Capture donor details (Name, Email, Address, etc.)
- Record single-time donations
- Manage monthly recurring donations
- Generate a thank-you letter or email after each donation
2. Setup Salesforce & NPSP:
- If not done already, set up Salesforce with the Nonprofit Success Pack (NPSP).
- Configure basic organization settings including fiscal year, currency, etc.
3. Customize Contact and Account:
- Use Salesforce’s customization tools to add any additional fields to the Contact object that may be unique to HealthyKids Foundation.
- Use NPSP’s Household model to group family donors together.
4. Implement Donation Management:
- Single-Time Donations:
- Utilize the Opportunity object in NPSP. Rename it to “Donations” for clarity.
- Create a picklist field “Donation Type” with values “One-Time” and “Recurring”.
- For one-time donations, create a new Donation record associated with the donor’s Contact and Household.
- Recurring Donations:
- NPSP has a Recurring Donations object. Set it up to capture details about the frequency, amount, and duration of the recurring donation.
- Each installment of the recurring donation would be a separate Donation (Opportunity) record linked to the main Recurring Donation.
5. Automate Thank-You Process:
- Email: Use Salesforce’s Process Builder or Flow to automate an email. When a Donation record is created, an email will be sent to the donor with a thank-you note.
- Letter: For those who prefer physical mail, create a template for a thank-you letter. Staff can generate this from the Donation record, print, and mail.
6. Reporting & Analysis:
- Create custom Reports in Salesforce to analyze donation patterns, recurring vs. one-time donations, largest donors, etc.
- Design Dashboards for the leadership team to get real-time insights on fundraising.
7. Testing & Training:
- Before rolling out, test all configurations and automations to ensure accuracy.
- Train staff on entering donations, managing recurring donations, and utilizing thank-you processes.
8. Rollout & Ongoing Management:
- Begin entering real donation data.
- As the organization grows and needs to evolve, revisit configurations, and make adjustments as needed.
3. Use-case: Volunteer Management
Scenario: “CommunityHelpers Foundation” is a nonprofit organization focused on various community service projects like park clean-ups, tutoring for children, and senior assistance. They have a growing base of volunteers and need a system to manage their details, availability, areas of interest, and assignments.
Implementation:
- Define Requirements:
- Capture volunteer details (Name, Email, Phone, etc.)
- Track volunteer interests (e.g., tutoring, clean-ups, senior assistance)
- Manage volunteer availability schedules
- Assign volunteers to specific projects and notify them
2. Setup Salesforce & NPSP:
- Ensure Salesforce with the Nonprofit Success Pack (NPSP) is set up.
- Adjust basic organizational settings for “CommunityHelpers Foundation”.
3. Customize Contact for volunteers:
- Enhance the Contact object to include fields relevant to volunteers such as “Areas of Interest”, “Available Days”, “Available Times”
4. Implement Volunteer Interests:
- Create a multi-select picklist or a related object called “Volunteer Interests”. Populate it with options like “Tutoring”, “Clean-ups”, “Senior Assistance”, etc.
- Allow volunteers (or staff) to select multiple areas of interest.
5. Manage Volunteer Availability:
- On the Contact record, add fields or create a related custom object for “Availability”.
- This could be done with fields like “Available Start Time”, “Available End Time”, and “Days of the Week”.
6. Project Assignments:
- Create a custom object called “Community Projects”.
- Fields might include “Project Name”, “Project Type” (related to the Interests), “Date”, “Required Volunteers”, and “Assigned Volunteers”.
- When creating a new project, staff can match volunteers based on their interests and availability. Assignments can be made on this object by linking volunteers (Contacts) to the project.
7. Automate Notifications:
- Using Salesforce’s Process Builder or Flow, create automation to notify volunteers when they are assigned to a new project. This can be done via email, ensuring they’re informed of the assignment details, date, time, and location.
8. Reporting & Insights:
- Construct custom Reports to monitor the number of active volunteers, their areas of interest, upcoming projects, and project assignments.
- Build Dashboards for the volunteer coordination team to get an overview of volunteer distribution, project status, and more.
9. Testing & Training:
- Thoroughly test all configurations, especially the notification processes, to ensure they work seamlessly.
- Train staff on how to input new volunteers, assign them to projects, and manage project details.
10. Rollout & Ongoing Management:
- Begin registering volunteers and creating community service projects.
- As projects evolve and the volunteer base grows, continuously review configurations to ensure they still align with the organization’s needs.
This structured approach for “CommunityHelpers Foundation” provides a base for efficient volunteer management. As always, the organization’s exact needs might vary, and the setup may require tweaks and adjustments to fully align with their unique requirements.
4. Use-case: Constituent Relationship Management
Scenario: “ArtRevive Association” is a nonprofit organization that works to promote arts and culture in underserved communities. They interact with donors, artists, community leaders, volunteers, and beneficiaries. They wish to maintain and manage these relationships, track interactions, and categorize each contact based on their role or association with the organization.
Implementation:
- Define Requirements:
- Capture constituent details (Name, Email, Address, Role/Type, etc.)
- Track interactions with each constituent (emails, meetings, phone calls)
- Categorize contacts based on their association (donor, artist, volunteer, etc.)
- Maintain a history of donations, events attended, artworks submitted, etc., by type of contact.
2. Setup Salesforce & NPSP:
- If not already done, install and set up Salesforce with the Nonprofit Success Pack (NPSP).
- Adjust basic settings to suit “ArtRevive Association”.
3. Customize Contact and account:
- Use Salesforce’s customization tools to add fields to the Contact object, such as “Constituent Type” or “Role” with picklist values (Donor, Artist, Volunteer, Beneficiary, etc.)
- Use NPSP’s Household model to associate family members or related contacts.
4. Track interactions:
- Utilize Salesforce’s Activities (Tasks and Events) to record interactions. This allows the tracking of meetings, calls, emails, and other touchpoints with each contact.
- Consider integrating Salesforce with an email tool to automatically log email interactions.
5. Categorizing and Segmenting Contacts:
- Based on the “Constituent Type” or “Role” field, segment the contacts. This aids in targeted communications, events, or fundraising efforts.
- Use Salesforce Reports and List Views to easily filter and view segmented lists.
6. Maintain a History:
- For Donors: Utilize NPSP’s Opportunities to track donations. Link each donation to the corresponding contact.
- For Artists: Create a custom object called “Artwork Submissions” or similar. Record each artwork, event, or exhibit associated with the artist.
- For Volunteers: Record volunteer hours, events participated in, or other related metrics.
- For Beneficiaries: If they benefit from events, workshops, or grants, track these details using custom fields or related records.
7. Automate Communications:
- Set up flows or processes to send automated thank-you emails or reminders. For instance, after a donation is recorded, automatically send a thank you note.
- Schedule periodic check-ins or updates to maintain engagement with each type of constituent.
8. Reporting & Insights:
- Create custom Reports to analyze data like top donors, most active artists, volunteers’ contributions, etc.
- Use Dashboards to visualize these insights for better decision-making.
9. Testing & Training:
- Before rolling out to the whole team, test all customizations and automation.
- Provide training sessions for staff on how to input data, track interactions, and extract meaningful reports.
10. Rollout & Ongoing Management:
- Begin populating Salesforce with contacts, interactions, and histories.
- Periodically review the system to accommodate new requirements or adjust based on feedback.
Through this approach, “ArtRevive Association” can ensure they maintain strong, informed, and data-driven relationships with their diverse group of constituents. As always, specific needs might differ based on the organization’s activities and goals, so customization should be done accordingly.
5. Use-case: Fundraising Campaign Management
Scenario: “EduBright Foundation” is a nonprofit organization aimed at enhancing education in underserved areas. They organize annual fundraising campaigns to gather funds for building schools, distributing educational materials, and training teachers. They wish to manage their campaigns, track contributions, and understand campaign effectiveness to improve future endeavors.
Implementation:
- Define Requirements:
- Catalogue campaign details (Name, Target Amount, Start Date, End Date, Campaign Theme, etc.)
- Track contributions linked to each campaign.
- Evaluate campaign success based on funds raised vs. targets.
- Understand sources of donations (online, events, direct mail, etc.)
2. Setup Salesforce & NPSP:
- Confirm that Salesforce with the Nonprofit Success Pack (NPSP) is in place.
- Adapt basic settings to reflect “EduBright Foundation”.
3. Campaign configuration:
- Use Salesforce’s Campaign object. Configure fields to capture data like the campaign’s goal, theme, and timeline.
- Set up parent-child campaign hierarchies if there are sub-campaigns or events under a main fundraising campaign.
4. Track contributions:
- Utilize NPSP’s Opportunity object to record donations.
- Link each donation to a campaign, which allows for tracking the source and effectiveness of each fundraising initiative.
- Differentiate between types of donations (one-time, recurring, in-kind) and sources (online, event, direct mail) using picklists or record types.
5. Campaign channels:
- To manage different fundraising methods (like online campaigns, charity dinners, or direct mail efforts), use different campaign records or campaign types. This enables precise tracking of each channel’s success.
6. Automate Donor Acknowledgment:
- Implement automation, such as Salesforce’s Process Builder or Flow.
- When a donation is linked to a campaign, trigger a ‘Thank You’ email or acknowledgment. Personalize it based on the campaign and donation details.
7. Engage Potential Donors:
- Use Salesforce Campaign Members functionality to list potential donors for each campaign. Track their engagement levels (Sent, Opened, Responded, Donated).
- Utilize email marketing integrations (like Marketing Cloud or Pardot) to send out campaign communications.
8. Reporting & Analysis:
- Generate custom Reports to evaluate campaign success. Examine metrics like the percentage of target achieved, average donation size, and channel-wise contributions.
- Create Dashboards that visually represent these insights, enabling stakeholders to make informed decisions.
9. Testing & Training:
- Thoroughly test configurations, especially automations, to ensure the correct execution of workflows.
- Train the fundraising and communication teams on how to set up campaigns, track donations, and evaluate results.
10. Rollout & Continuous Optimization:
- Start by rolling out one campaign, collecting feedback, and refining the process.
- As each campaign concludes, gather insights and optimize the next campaign based on lessons learned.
By implementing this structure, “EduBright Foundation” can effectively manage their fundraising campaigns, ensuring they capture all necessary details, track every donation, and gauge the effectiveness of their strategies. They can then use this data-driven approach to refine and improve future fundraising efforts. As always, specific requirements may vary, so it’s essential to tailor the setup to the unique needs of the organization.
6. Use-case: Event Management
Scenario: “HealthFirst Alliance” is a nonprofit organization focused on promoting holistic health practices. They organize various events such as health camps, workshops, webinars, and annual conferences. They want to manage event logistics, track attendee registrations, monitor attendance, and collect feedback post-event.
Implementation:
- Define Requirements:
- Log event details (Name, Date, Location, Type, Capacity, etc.).
- Register attendees and manage their details.
- Track actual attendance versus registrations.
- Collect and analyze post-event feedback.
2. Setup Salesforce & NPSP:
- Make sure Salesforce with the Nonprofit Success Pack (NPSP) is properly set up.
- Adjust basic settings in line with “HealthFirst Alliance.”
3. Event configuration:
- Use Salesforce’s Campaign object to represent each event. Customize fields to include event-specific details like venue, capacity, and type (workshop, webinar, conference, etc.).
- For multi-session or multi-day events, consider creating parent and child campaigns.
4. Manage attendee registrations:
- Utilize Campaign Members in Salesforce to represent attendees. Store details like registration date, payment status, and ticket type.
- If online registrations are preferred, consider integrating Salesforce with an event registration platform. This way, registrations can be automatically added to the campaign as Campaign Members.
5. Track attendance:
- Create custom fields on the Campaign Member record to indicate attendance, such as a checkbox that can be checked off during or after the event.
- For larger events, integrating barcode or QR code scanners can streamline attendance tracking.
6. Feedback Collection:
- Post-event, send out surveys to attendees. Salesforce can integrate with tools like SurveyMonkey or use its native survey capabilities (where available).
- Capture feedback responses linked to the specific event and attendee. This provides insights for future events.
7. Communication & Engagement:
- Automate pre-event reminders using tools like Process Builder or Flow. This can reduce no-show rates.
- After the event, automate thank-you messages or emails, acknowledging attendees’ participation.
8. Reporting & Analytics:
- Construct custom Reports to analyze metrics like registration vs. attendance, feedback scores, and attendee demographics.
- Set up Dashboards to provide a visual representation of event success metrics, aiding in swift decision-making.
9. Testing & Training:
- Before full-scale implementation, test all configurations, especially integrations with other platforms.
- Train event and admin teams on how to use the system for event management, from creation to post-event analysis.
10. Rollout & Continuous Improvement:
- Launch the event management process with one or two events to start, then refine based on feedback and observations.
- After each event, conduct a review to identify areas of improvement and implement changes accordingly.
By implementing this framework, “HealthFirst Alliance” can effectively organize and manage their events, ensuring a smooth experience for both attendees and organizers. This structure also helps in making data-driven decisions, enhancing the quality and impact of each subsequent event. As is the case with any CRM system, it’s crucial to continuously evolve and adapt the process to best fit the organization’s needs.
7. Use-case: Soft-Credits and Acknowledgements
Scenario: “ArtLives” is a nonprofit organization dedicated to promoting art education in local communities. They receive many donations from corporate sponsors, influenced by key individuals who champion their cause within those corporations. “ArtLives” wants to track these influencers (who often do not directly contribute) and ensure they receive appropriate acknowledgments.
Implementation:
- Define Requirements:
- Capture details of the influencer who played a role in obtaining the donation.
- Assign an appropriate soft credit value to these influencers.
- Automate acknowledgment processes for the influencers.
2. Setup Salesforce & NPSP:
- Ensure that Salesforce with the Nonprofit Success Pack (NPSP) is properly configured.
- Configure the NPSP settings to tailor Soft Credit and Acknowledgement functionalities to “ArtLives”.
3. Soft Credit Configuration:
- Within NPSP, utilize the Opportunity Contact Role to establish the relationship between the donation (Opportunity) and the influencer (Contact).
- Set the role as something indicative, like “Influencer” or “Referrer”.
- Assign a soft credit value. This could be the full amount of the donation or a fraction, based on organizational policies.
4. Acknowledgment Setup:
- Use Process Builder or Flow to automate the acknowledgment process.
- For instance, once a Contact is given a soft credit for a donation, this can trigger an automated ‘Thank You’ email or a task for a team member to send a personalized note.
5. Tracking and Reporting:
- Implement custom Reports to analyze the impact of influencers on donations. Check metrics like total donations influenced, average influence value, and more.
- Set up Dashboards for a visual overview, helping in identifying top influencers and ensuring they get special attention or recognition.
6. Custom Acknowledgments:
- For high-value influencers, consider implementing a process for more personalized acknowledgments, such as handwritten notes, exclusive event invitations, or special mentions during events.
- This can be automated by setting certain thresholds in Salesforce that, when reached, alert the team to take special actions.
7. Testing & Training:
- Test the soft credit and acknowledgment processes thoroughly, ensuring that automations work as intended.
- Train fundraising and donor relations teams on how to use and manage the soft credit system, emphasizing its importance in nurturing relationships.
8. Rollout & Continuous Feedback:
- Start the rollout in phases, perhaps focusing on major donations first, to ensure the system works seamlessly.
- Periodically gather feedback from both staff and influencers to refine the acknowledgment process.
By implementing this system, “ArtLives” can recognize and nurture the relationships with those key individuals who, while not directly donating, play an instrumental role in their fundraising success. This not only strengthens relationships but often leads to increased future donations, both direct and influenced.
8. Use-case: Reporting & Dashboards
Scenario: “SaveOurStreams” is a nonprofit organization focused on preserving freshwater ecosystems. As their activities and community engagements expand, they require a structured way to visualize their impact, track donations, manage their volunteers, and monitor campaigns.
Implementation:
- Define Requirements:
- Identify the key metrics “SaveOurStreams” needs, such as funds raised, number of active campaigns, volunteer hours logged, and outreach program results.
- Determine the frequency of these reports (daily, weekly, monthly) and who the primary audience for each report is.
2. Setup Salesforce & NPSP:
- Ensure that Salesforce with the Nonprofit Success Pack (NPSP) is installed and configured.
- Familiarize yourself with NPSP’s built-in reports and dashboards tailored for nonprofits.
3. Custom Report Creation:
- Navigate to the Salesforce Reports tab and click “New Report”.
- Select the appropriate report type, for example:
- Campaigns with Opportunities
- Opportunities with Contact Roles and Recurring Donations.
- Define filters, groupings, and summary fields as per “SaveOurStreams” requirements.
- Save and name the report for easy future access.
4. Dashboard Configuration:
- Navigate to the Salesforce Dashboards tab and click “New Dashboard”.
- Design the dashboard layout by choosing the number of columns and the components’ placement.
- Add components (chart, table, metric, etc.) to the dashboard by sourcing data from the reports created earlier.
- For instance, a pie chart for donation sources, a gauge for funds raised vs. target, and a table for active campaigns.
5. Scheduled Refresh & Distribution:
- Set dashboards to refresh at defined intervals, ensuring stakeholders always view the most recent data.
- Implement scheduled email distributions of these dashboards to relevant staff and stakeholders.
6. User Access & Security:
- Configure permissions so that only authorized individuals can view, edit, or share specific reports and dashboards.
- This ensures data integrity and maintains privacy.
7. Testing & Iteration:
- Thoroughly test the reports and dashboards with a subset of users from “SaveOurStreams”.
- Gather feedback and refine the visualizations to ensure they meet the organization’s needs effectively.
8. Training & Documentation:
- Provide training sessions for the staff, ensuring they understand how to interpret the data and use the reporting tools.
- Create documentation or user guides to assist in the ongoing usage and potential customizations of these reports and dashboards.
9. Rollout & Continuous Optimization:
- Start by rolling out the reports and dashboards to a broader audience within “SaveOurStreams”.
- Periodically review and refine the dashboards, adapting to the evolving needs of the organization.
By following these steps, “SaveOurStreams” will have a comprehensive view of their operations, successes, and areas of opportunity. Regularly viewing and analyzing these dashboards will empower the organization to make data-informed decisions, ensuring maximum impact for their mission.

NPSP Resource Hub: Dive-In Tutorials & Helpful Links
Continue your journey with the Nonprofit Success Pack (NPSP) with this curated list of tutorials, guides, and essential links. Perfect for both NPSP novices and seasoned Salesforce enthusiasts looking to brush up their knowledge. Harness the power of NPSP and make a difference!
Official Salesforce NPSP Documentation:
https://help.salesforce.com/s/articleView?id=sfdo.NPSP_Learn_About.htm&type=5
NPSP Trailheads:
https://trailhead.salesforce.com/es/content/learn/trails/nonprofit_fundraising
NPSP Overview:
https://bolt.today/blogs/nonprofit-success-pack.html
https://www.accountingseed.com/resource/blog/is-salesforce-a-good-crm-for-nonprofits/
Benefits of NPSP:
https://www.linkedin.com/pulse/have-you-ever-wondered-what-benefits-npsp-can-bring-your-santiago/
https://donorbox.org/nonprofit-blog/salesforce-for-nonprofits
Donor info:
https://www.classy.org/blog/donor-cycle-stages/
https://nonprofitsdecoded.com/small-nonprofit-major-donor-strategy/
Want to continue the discussion?
Feel free to reach out – let’s talk! Fill in the form below and we’ll be in touch soon: